If you have spent any time in a woodshop, you know the struggle. is a universal woodworking frustration: you remove a dull blade from your bandsaw, and suddenly you are wrestling a giant, floppy loop of spring steel that insists on being 100 inches in diameter. When you try to hang it on a peg, it drags awkwardly on the floor; when you attempt to shove it into a drawer, it springs back out like a jagged jack-in-the-box.
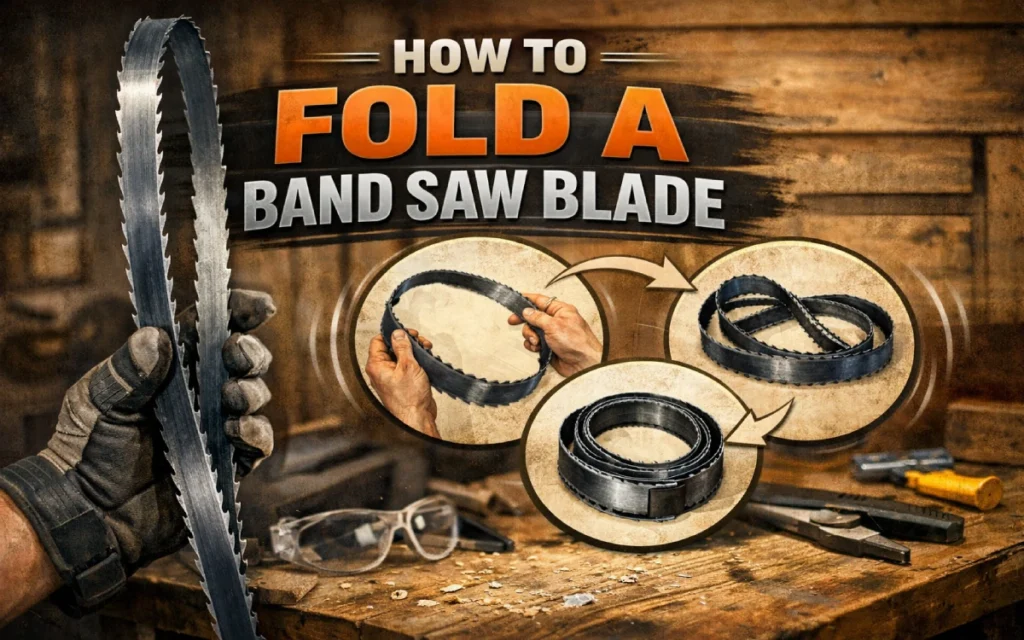
Folding a blade into three neat coils is the “secret handshake” of the shop. Here is how to master the three-loop fold without losing your patience (or a finger). Learning how to fold a band saw blade-or “coiling” it, as we usually say in the trade-is one of those fundamental skills that separates the weekend warriors from the serious craftsmen.
It’s not just about keeping your shop tidy; it’s about safety. A loose blade left leaning against a wall is a tripping hazard and a recipe for damaged teeth (or damaged shins).
I’ve been working with bandsaws for decades, from little 10-inch benchtop models to massive industrial resaw beasts. I’ve coiled thousands of blades, and I promise you: once you get the “knack,” it becomes muscle memory. It takes three seconds, looks like a magic trick to the uninitiated, and saves you a ton of storage space.
Why We Coil: The Physics of the Twist
Before we start twisting metal, it helps to understand what we are actually doing. A bandsaw blade is a loop. To make it smaller, we have to force that single loop to fold over on itself into three smaller concentric loops.
We achieve this by introducing torsion. By twisting the blade at specific points, we trick the steel into relaxing into that triple-coil shape. If you just try to bend it like a piece of wire, you’ll kink the steel and ruin the blade. You have to work with the tension, not against it.
When done correctly, a 93-½ inch blade (common for 14-inch saws) coils down into a circle about 10 to 12 inches in diameter. That fits easily in a drawer or on a small wall peg.
Safety First: Respect the Teeth
I cannot stress this enough: Wear leather gloves.
I know, I know. We often preach taking gloves off when operating spinning machinery because of the entanglement risk. But when the machine is off and you are handling the blade? Gloves are mandatory.
A sharp bandsaw blade is essentially a flexible serrated knife. When you fold it, the blade carries a lot of stored kinetic energy. If you lose your grip, or if the blade snaps open (which it will do if you miss the fold), those teeth are going to rake across your hands.
- Gloves: Heavy-duty leather is best. Mechanics gloves work, but thick hide gives you better protection against a snap-back.
- Safety Glasses: Always. If a blade has a bad weld and snaps while you are tensioning it, you don’t want steel flying near your eyes.
- Body Position: Hold the blade away from your face and chest. I’ve seen blades spring open and catch a guy’s shirt.
Method 1: The “Steering Wheel” (The Standard Two-Hand Twist)
This is the most common method and works best for blades that are 1/8″ to 1/2″ wide. If you are running standard blades on a 14-inch shop saw, this is the technique you will use 90% of the time.
Think of this method like holding a steering wheel, but you are going to perform a specific, fluid motion.
Step 1: The Setup
Stand in an open area of your shop. You need enough room to swing your arms without hitting your table saw or lumber rack. Hold the blade in front of you with both hands.
- Hand Position: Imagine the blade is a clock. Place your hands at 4 o’clock and 8 o’clock. Your palms should be facing inward, toward each other, holding the blade with your thumbs on the outside or top edge.
- The Teeth: Make sure the teeth are pointing away from you. This is crucial. If the coil slips, you want the sharp bits flying outward, not into your gut.
Step 2: The Thumb Twist
This is the secret sauce. You aren’t just pushing your hands together; you are rotating your wrists.
- While holding the blade at the bottom, use your thumbs to press the top edge of the blade down and outward.
- Simultaneously, rotate your wrists so your palms start facing up.
- The top of the loop (the 12 o’clock position) will naturally start to dip downward toward the floor.
Step 3: The Cross
As you twist your wrists and the top of the blade dips, bring your hands toward each other.
- The blade will start to buckle into two loops at the bottom and one loop at the top. It will look like a distorted Mickey Mouse head for a split second.
- Keep bringing your hands together and crossing them over. Your left hand should move toward the right, and your right hand toward the left.
Step 4: The Catch
As your hands cross, the top loop (which is now hanging low) will naturally fall into place with the two loops you are creating with your hands.
- Let the blade collapse into three circles.
- You will feel the tension release. The blade will “snap” gently into the coiled position.
- Align the three loops so they sit neatly on top of one another.
Tip: If the blade fights you or starts twisting into a figure-eight that looks like a pretzel, stop. Let it pop back open to the full circle and reset your grip. Don’t force a bad fold.
Method 2: The “Step and Twist” (For Large or Resaw Blades)
If you are rocking a 3/4″ or 1″ carbide-tipped resaw blade, the steering wheel method can be tough. These blades are thicker, stiffer, and require more leverage to fold. For these, I use the floor.
Step 1: Secure the Blade
Find a spot on your shop floor that isn’t concrete (or put down a rubber mat or piece of plywood). You don’t want to chip expensive carbide teeth on hard cement.
- Stand the blade vertically on the floor.
- Step on the blade at the 6 o’clock position with one foot. Plant your foot firmly on the flat of the blade, not the teeth. (Again, make sure teeth point away from your leg).
Step 2: The Hand Hold
Reach down and grab the blade at the 10 o’clock and 2 o’clock positions. Your palms should be facing inward.
Step 3: The Bow
This move is all about leverage.
- Push your thumbs against the spine (back edge) of the blade.
- Twist your wrists inward and push the top of the blade down toward your foot.
- You are essentially bending the top half of the blade down to meet your foot, while twisting the sides.
Step 4: The Fold
As you push down, the blade will naturally want to curl into three loops.
- The two side loops (held by your hands) will curl inward.
- The top loop will fold down over them.
- Once the coils are close to the floor, release your hands carefully and let the loops settle. Step off the blade and gather the coils.
Troubleshooting: Why does my blade look like a Taco?
Sometimes, you finish the fold and the blade isn’t three nice concentric circles. Instead, it looks like a bent taco shell or a warped potato chip.
This usually happens because the loops were folded “inside out” relative to each other.
- Don’t panic. You didn’t ruin the blade.
- Find the odd loop. Usually, one of the three loops is flipped the wrong way.
- The Fix: Hold the two “good” loops in one hand. Take the rogue loop in the other hand and gently rotate it 180 degrees until it nests flat against the others. It should pop right into place.
Unfolding the Blade: The Scary Part
Honestly, unfolding the blade scares beginners more than folding it. That stored energy wants to release now. If you just let go, it creates a loud “BOING” and can whip around dangerously.
- Hold the coils: Hold the three coiled loops firmly in one hand.
- Find the outer loop: Identify the single loop that wraps around the others.
- The Controlled Release: Pull that outer loop away gently with your free hand.
- ** The Cast:** As the blade starts to expand, toss it gently away from you (like casting a fishing line) while holding onto the bottom of the loop.
- Let it open: Allow the blade to spring into its full circle shape away from your body. Never hold it close to your face when unfolding.
Storage and Maintenance Tips
Now that you have mastered the fold, don’t just throw the blades in a pile. Proper storage extends blade life.
1. The Zip Tie Trick
Once the blade is coiled, it can easily pop open if bumped. I use a simple plastic zip tie or a twist tie (like from a loaf of bread) to secure the three loops together. This keeps them compact and safe to handle.
2. Preveting Rust
Carbon steel rusts. If you live in a humid climate or work in a garage shop, a coiled blade sitting in a drawer for six months will develop rust spots. Before coiling, I wipe down the blade with a rag and a little Camellia oil or Jojoba oil. You can also use a light coat of paste wax. Avoid silicone-based sprays, as they can interfere with wood finishes later on.
3. Inspection Time
Coiling is the perfect time to inspect your blade. While the blade is off the saw, run your gloved fingers along the spine. Feel for any kinks or cracks. Look closely at the gullets (the valley between teeth). That is where fatigue cracks start. If you see a hairline crack, throw the blade away. Do not try to weld it or use it “one last time.” A blade snapping at 3,000 feet per minute is not worth the $20 replacement cost.
4. Labeling
If you have multiple blades (6 TPI for ripping, 14 TPI for curves), they all look the same when coiled. I use a piece of blue painter’s tape wrapped around the coil and write the specs on it with a Sharpie (e.g., “¼ inch – 14 TPI”). This saves me from having to uncoil three different blades just to find the one I need.
Frequently Asked Questions (FAQ)
1. Can I damage the blade by coiling it incorrectly?
Generally, no. Band saw blades are made of high-fatigue spring steel. They are designed to bend. However, if you force the blade into a sharp kink rather than a smooth loop, you can permanently deform the metal. If the blade feels like it’s fighting you hard, stop and reset. Never force a kink.
2. Does this folding method work for all blade widths?
The “Steering Wheel” method works best for blades up to 1/2 inch wide. For 3/4 inch, 1 inch, or wider carbide blades, the “Step and Twist” method is much easier and safer because the steel is too stiff to manipulate with wrist strength alone.
3. How do I know if my band saw blade is dull?
There are a few tell-tale signs. If you have to push the wood hard to get it through the cut, the blade is dull. If the blade wanders or drifts significantly to one side despite being set up correctly, or if you smell burning wood during a cut, it’s time to change (and coil!) that blade.
4. Should I clean the blade before coiling it?
Yes. Pitch and resin build-up on the blade can shorten its life and cause friction. Before you coil it for storage, wipe it down with a pitch remover or a safe solvent (like mineral spirits) and a scouring pad. A clean blade cuts cooler and lasts longer.
5. Is it safe to store coiled blades touching each other?
Yes, but be careful of the teeth. If you throw a bunch of coiled blades in a drawer, the teeth of one blade can dull against the steel of another. It is best to tie them individually with zip ties or twist ties to keep them tight, and lay them flat or hang them on individual pegs.
Conclusion
Learning how to fold a band saw blade is a small victory, but it feels good every time you do it. It turns an unwieldy, dangerous hoop of steel into a manageable, organized tool.
It might take you five or six tries to get the wrist motion right. That’s normal. Put on your heavy gloves, step into the middle of your shop, and practice. Once you feel that steel snap into a perfect triple coil, you’ll never go back to hanging giant loops on your wall again.
Keep it sharp, keep it safe, and go make some sawdust.