If you spend enough time in front of a bandsaw, you’re going to hear it eventually: that loud BANG followed by the flopping sound of a blade that just snapped. It usually happens right in the middle of a complex resaw or a tight scroll cut.
Most hobbyists just curse, toss the blade in the trash, and order a new one for $30 or $40. But if you’re running a production shop or you just hate wasting good steel, you know that a snapped blade isn’t dead—it’s just interrupted.
Learning how to weld bandsaw blades is a rite of passage for serious woodworkers. Whether you are using a high-end resistance welder built into your industrial saw or a simple propane torch and some silver solder on a bench jig, fixing your own blades saves you a fortune and keeps your project moving.
In this guide, I’m going to walk you through the entire process. We’ll cover the two main methods: resistance welding (for those with the gear) and brazing/silver soldering (the DIY standard). We’ll also dig into the “secret sauce” that keeps welds from snapping again: annealing.
Why Weld Your Own Blades?
Before we get the torch out, let’s talk about why this is worth your time.
- Cost Savings: If you buy bulk coil stock (blade material in 100-foot rolls), your cost per blade drops significantly—often by 50% or more compared to buying pre-welded loops.
- Instant Repairs: When a blade snaps on a Sunday afternoon, you don’t have to wait three days for shipping. You can fix it in 15 minutes.
- Internal Cuts: This is a technique scroll sawyers know well. If you need to cut the center out of a ring without an entry cut, you can thread the blade through a drilled hole and weld it back together on the saw.
Method 1: The DIY Approach (Silver Soldering / Brazing)
For 90% of woodworkers reading this, this is the method you’ll use. You don’t need a $10,000 industrial saw with a built-in welder. You just need a simple jig, a torch, and some flux.
What You Need:
- A Jig: You can buy a blade splicing jig, but you can also make one out of scrap hardwood and toggle clamps. It just needs to hold the blade ends perfectly aligned.
- Propane or MAPP Gas Torch: MAPP gas gets hotter faster, but propane works fine for standard carbon steel blades.
- Silver Solder: Look for high-content silver solder ribbon or wire. Do not use plumbing solder; it’s too soft.
- Flux: Borax-based flux paste is essential to keep the steel clean during heating.
- Grinder or File: For scarfing the ends.
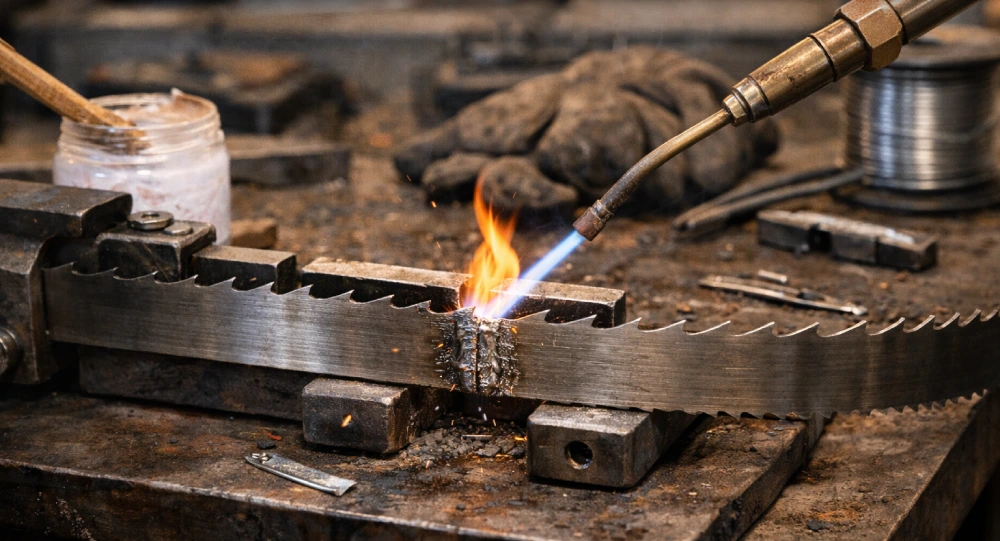
Step 1: Scarfing the Ends
This is the most critical step. You cannot simply butt two ends together and solder them; there isn’t enough surface area for a strong bond. You need to create a scarf joint (a long bevel).
- Take the two broken ends of the blade.
- Grind a bevel on opposite sides of each end. Imagine the blade thickness is a ramp. You want a ramp length that is roughly 5 to 8 times the thickness of the blade.
- Crucial Tip: Grind the bevels so that when you overlap them, the teeth pitch (the distance between teeth) remains consistent. If you mess this up, the blade will “tick” every time it goes through the wood.
Step 2: Clean and Align
Solder hates dirt and oil. Clean the beveled ends with acetone or denatured alcohol.
Place the blade ends in your jig. The beveled faces should overlap perfectly. The back of the blade must be perfectly straight against the jig’s back fence. If it’s crooked, the blade will wobble and drift in the cut.
Step 3: Flux and Solder
Apply a thin layer of flux to both beveled surfaces. Cut a tiny piece of silver solder ribbon—just enough to cover the joint area. Place the solder between the two beveled ends (like a sandwich) and clamp the blade down in the jig.
Step 4: The Heat
Fire up your torch.
- Direct the heat at the blade, focusing on the thickest part of the metal first, near the joint but not directly on the solder immediately.
- Watch the flux. It will boil and then turn clear.
- As the steel glows a dull cherry red, the silver solder will melt and flash, flowing throughout the joint via capillary action.
- Stop immediately. Remove the heat. Do not overheat the blade, or you will make the steel brittle.
Step 5: Cleanup
Once cool, file off the excess solder. The joint should be the exact same thickness as the rest of the blade. If it’s thicker, it will get stuck in your guides.
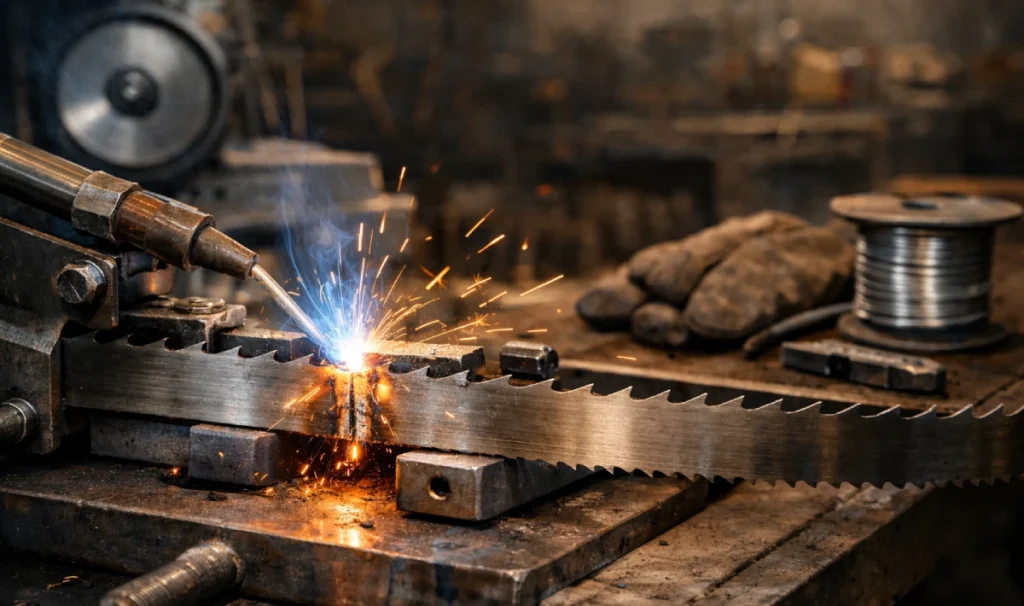
Method 2: The Pro Approach (Resistance Welding)
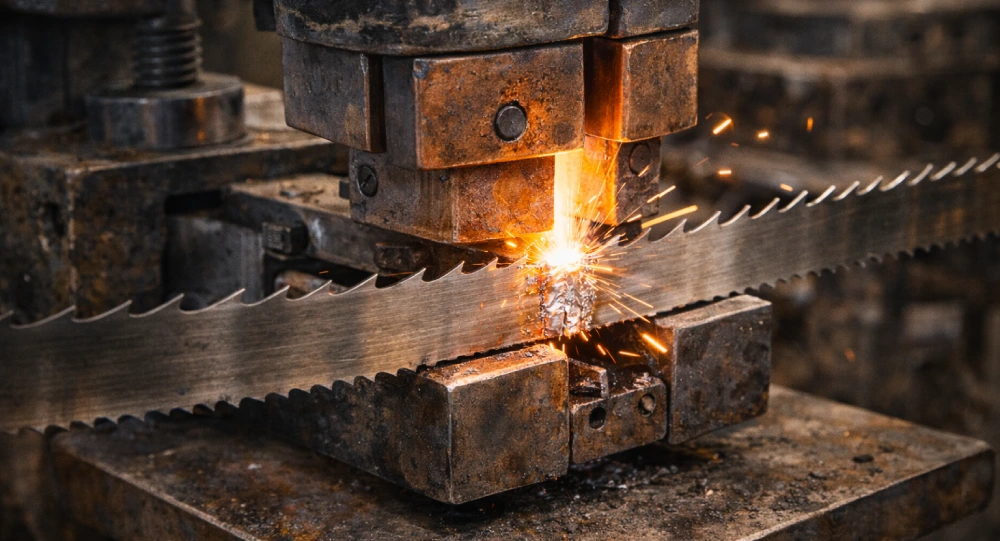
If you have a big industrial saw (like a DoAll or a large Tannewitz), it might have a resistance welder mounted right on the column. These machines use electricity to melt the blade ends together and fuse them under pressure.
Step 1: Shearing
Resistance welders usually have a built-in shear. You must cut the blade ends perfectly square. Unlike brazing, we are doing a butt weld here. If the cut is angled, the current won’t flow evenly, and you’ll get a blowout.
Step 2: Clamping
Clean the blade ends and clamp them into the welder jaws.
- Gap Spacing: The ends should touch lightly or have a microscopic gap depending on your machine’s manual.
- Alignment: Ensure the back of the blade is pressed firmly against the alignment fence.
Step 3: The Weld
Set the pressure dial based on the width of your blade (e.g., 1/2″, 3/4″). Press and hold the weld button.
- You will see a shower of sparks.
- The machine pushes the two molten ends together, creating a “flash” or a bulge of metal at the seam.
Step 4: Annealing (The Step Everyone Forgets)
This is where most people fail. Immediately after welding, the steel at the joint is incredibly brittle because it heated up and cooled down instantly (quenching). It is basically glass-hard. If you bend it now, it will snap.
You must anneal it.
- Release the clamps and move the blade to the annealing jaws (which are wider apart).
- Clamp it lightly.
- Switch the machine to “Anneal.”
- Pulse the button. Watch the weld area. You want to bring it to a dull red glow. Not bright orange, just a dull, dark red.
- Let it cool slowly. Do this a couple of times. This relaxes the grain structure of the steel, making it flexible again.
Step 5: Grinding the Flash
Remove the blade and grind off the “flash” (the bump of welded metal) using the machine’s built-in grinding wheel. Be careful not to grind into the blade body—you just want to remove the excess weld so it’s flush.
Troubleshooting Your Welds
Even pros mess this up. Here is what to look for when your weld fails.
1. The Blade Snaps Instantly Upon Tensioning
- Cause: You likely didn’t anneal it properly (resistance welding) or you overheated it (brazing).
- Fix: When annealing, ensure you get that dull red glow and let it cool slowly. If brazing, use MAPP gas to get in and out fast so you don’t cook the carbon out of the steel.
2. The “Tick-Tick-Tick” Sound
- Cause: Your alignment was off, or you ruined the tooth pitch.
- Fix: Check your scarf joint. Did you grind too much off one side? Did you align the teeth so the gullet spacing is consistent? If the spacing is off, that section of the blade will slam into the wood every revolution.
3. The Blade Wanders or Won’t Track
- Cause: The weld is crooked. If the back of the blade isn’t perfectly straight at the weld, the blade acts like a bent wheel.
- Fix: You have to cut the weld out and try again. Use a straight edge in your jig to ensure the back of the blade is dead flat.
When to Weld vs. When to Replace
I’m all for saving money, but sometimes a blade is just done.
- Fatigue Cracks: If you inspect your blade and see tiny hairline cracks in the gullets (the valleys between teeth), welding it is a waste of time. The metal is fatigued. You fix one break, and it will snap two inches away tomorrow.
- Dull Teeth: If the blade is duller than a butter knife, don’t bother welding it unless you plan on sharpening it too.
- Kinks: If the blade snapped and whipped around, getting a hard kink in the body, it will never track right again. Retire it.
Safety First
I can’t let you go without the safety talk.
- Eye Protection: Whether sparks from a resistance welder or flux popping from a torch, you need safety glasses.
- Fire Hazard: Welding blades involves fire and red-hot steel. Do this away from your pile of sawdust and shavings. Keep a fire extinguisher handy.
- Gloves: Leather gloves are great for handling the blade after it cools, but be careful wearing them while using a grinder (snag hazard).
Frequently Asked Questions (FAQ)
1. Can I use standard plumbing solder for bandsaw blades?
No. Plumbing solder is typically a lead-free or lead-tin mix that is far too soft and has low tensile strength. It will snap the moment you put tension on the blade. You must use high-strength silver solder (often 45% to 56% silver content) intended for brazing steel.
2. How do I know if I have annealed the blade correctly?
A properly annealed blade should be flexible at the weld site, just like the rest of the steel. If you try to bend the blade at the weld and it snaps with a “glassy” sound, it was too hard (under-annealed). If the weld bends effortlessly and stays bent like soft wire, it is too soft (over-annealed). You are aiming for a springy temper that returns to straight.
3. Is it cheaper to buy coil stock and weld my own blades?
Yes, significantly. Buying a 100-foot roll of blade stock can reduce the cost per blade by 50% or more compared to buying pre-welded loops. However, you have to factor in your time. If you run a production shop, the savings add up fast. For a hobbyist making one blade a year, it might not be worth the initial setup cost.
4. Can I weld bi-metal or carbide-tipped bandsaw blades?
You can, but it is much more difficult. Bi-metal blades have different metallurgical properties that can make annealing tricky. Carbide-tipped blades are expensive, so if the body breaks, it’s worth trying to repair, but ensure the heat doesn’t travel far enough to melt the brazing on the nearby carbide teeth.
5. Why does my blade bump when it goes through the guides?
This is usually caused by the weld joint being thicker than the rest of the blade. After welding (especially with silver solder), you must carefully file or grind the joint flush on the sides and the back. If the joint is swollen, it will hit the thrust bearings or side guides, causing a rhythmic thump and ruining your cut quality.
Final Thoughts from the Shop
Welding your own bandsaw blades is one of those skills that separates the assemblers from the fabricators. There is a deep satisfaction in taking a snapped piece of steel, fusing it back together, and finishing the cut.
Start with the silver solder method. It’s cheap, effective, and strong. Once you master the scarf joint and the color of the heat, you’ll never fear a snapped blade again.
Now, get out to the shop and make some sawdust.